
Our Equipment..and how and where to use it.....
* As pointed out elsewhere on our Website,it is important to be able to operate everywhere in your chosen location.Registering with your local City Council and getting your Donut Stand certified as compliant is crucial to your business being successful,as then you will be able to operate anywhere within the Councils area of influence. Food Carts come under the Food Act of 2014, and need what's called a Safe and Simple Food Plan.Please look on the MBIE Website for more details.We have spoken with the Auckland City Council regarding operating in the Auckland area.It appears that the normal Health and Safety requirements are needed,so we would assume that all Cities and towns in New Zealand would just need the normal Food Act of 2014 requirements to be met. However, there is a cost involved,which you need to be aware of. Unfortunately,we at El-Rashid's cannot control this.Our advice is as follows: After you get your equipment delivered and set up,spend some time getting familiar with the preparation procedure,such as the correct cooking oil temperature.Get your friends and family around,and get them to sample the Donuts and give some feedback,this is actually fun!! Save your funds during this time, ( the ingredients are exceptional cheap) and in a few weeks you will be able to afford the fees.In Nelson,it is currently around $365.00 plus a $78 surcharge to get registered. The equipment set-up needs to be certified by a registered Certifier ,who charges by the hour.The set-up is very simple,so not much time would be required for the Certifier to get it done.It is also very simple,no refrigeration, no having to throw out food after a set time,etc. We wish we could assist with this process and avoid the costs to you,but it is just part of the cost of doing business.Your local Council may insist that you carry Public Liability Insurance,so check with them regarding this.This can be arranged reasonably easily,and can be paid in monthly installments, so phone around if you are required to have this and get the best deal . However, please contact us for any further advice during the process,we will do our best to assist where possible.
*PLEASE NOTE : El-Rashids' vegan Moroccan Donuts are a year-round treat! We have found them to just as popular in Summer as they were in the colder months as a warm, delightful healthy snack.
Beyond the ordinary
This is where our journey begins. Get to know our business and what we do, and how we're committed to quality and great service.
Here are some very important facts,hints, information and general specials features of El - Rashids vegan Moroccan Donuts.
*
The equipment , which includes the unique, Copyright recipe, has a very small footprint,so there may be room for negotiation with a Market proprietor for a reduction in site rental.It is possible to use just a Gazebo,so if possible,your vehicle could be parked off-site for a further reduction.
* As above,it is possible to just use a Gazebo on-site for an even smaller footprint than used by a Car ,Van, or SUV . In this case, simply carry a small 12 volt battery to power the water-pump for continuous hot and cold water.
HINT : Buy 4 x 10 litre water containers at a Supermarket.They will be filled with spring water, and when when you have used the water,fill with tap water and use them as weights to hold your Gazebo down.Also ,you will need one filled with water to supply your 8 litre Hot Water heater, plus another empty one for waste water.However,these should be at least 20 liters.Remember,you can never carry too much water!
*The dough for El-Rashid's Moroccan Donuts can be prepared on-site, taking about an hour to rise.We recommend preparing it using the hand- kneading process (described in detail in the Instructions) so it can be rising while you are setting up.The major benefit of this is that no Commercial Kitchen is required for the food prep stage,a huge advantage and cost saving.
ANOTHER HINT: Find a Coffee Cart in your area,there are a lot of owners who operate during the day in most NZ towns. Check to see if they offer much in the way of food,and,if not,see if they would let you set up next to them from time to time.Nothing beats Coffee and Donuts!!
ANOTHER HANDY HINT: Eventually,you will need your own EftPos or Point Of Sale set-up.These can be rented for as little as $25.00 per day. Until you attend a fairly big event,you can make do with selling the Donuts for cash.If you price the Donuts at , say,$5 each,most of the public will have that on them either notes or coins.Have a float on hand of around $50.00 in coins and $5 notes.If some customers are really interested,it doesn't hurt to give them one to try for free....they will remember your kindness and spread the word!
Another super "value-added" hint :
It is possible to use your El-Rashids' Moroccan Donuts Stand for a backup home 'survival ' source in a power-cut.... have a spare gas bottle on hand and a 12 volt battery,and you will have a efficient gas powered cooktop and hot and cold running water.
our equipment.......

For the folks who have taken the plunge and ordered the Package, congratulations and best wishes!
This section is for you,it will show you how to assemble the equipment and get up and running....
Assembling the Burner and Stand.....
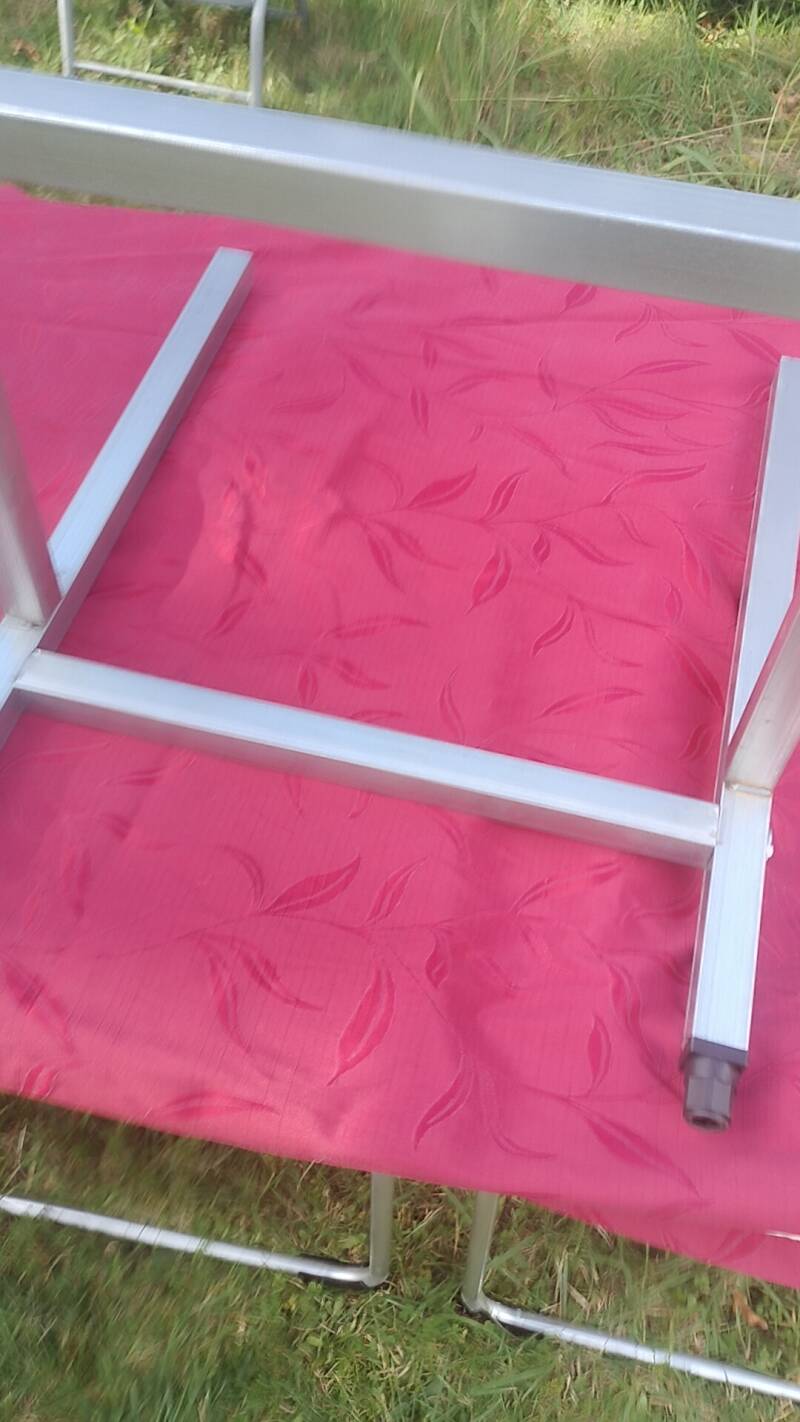
This is what the Burner Stand will look like after unpacking.


Put a washer on one of the long bolts,and tighten up,not too tight,just firm,using a 12mm socket or wrench.Always use the washers provided.If you have a cordless drill,it would be good to get an adapter to use a socket on it.This would speed up assembly and disassembly.Note the use of gloves,this is recommended as there are some sharp edges on some of the equipment.
As per below,invert the frame and attach the other cross- brace and tighten.
Tightening the cross-brace bolts.
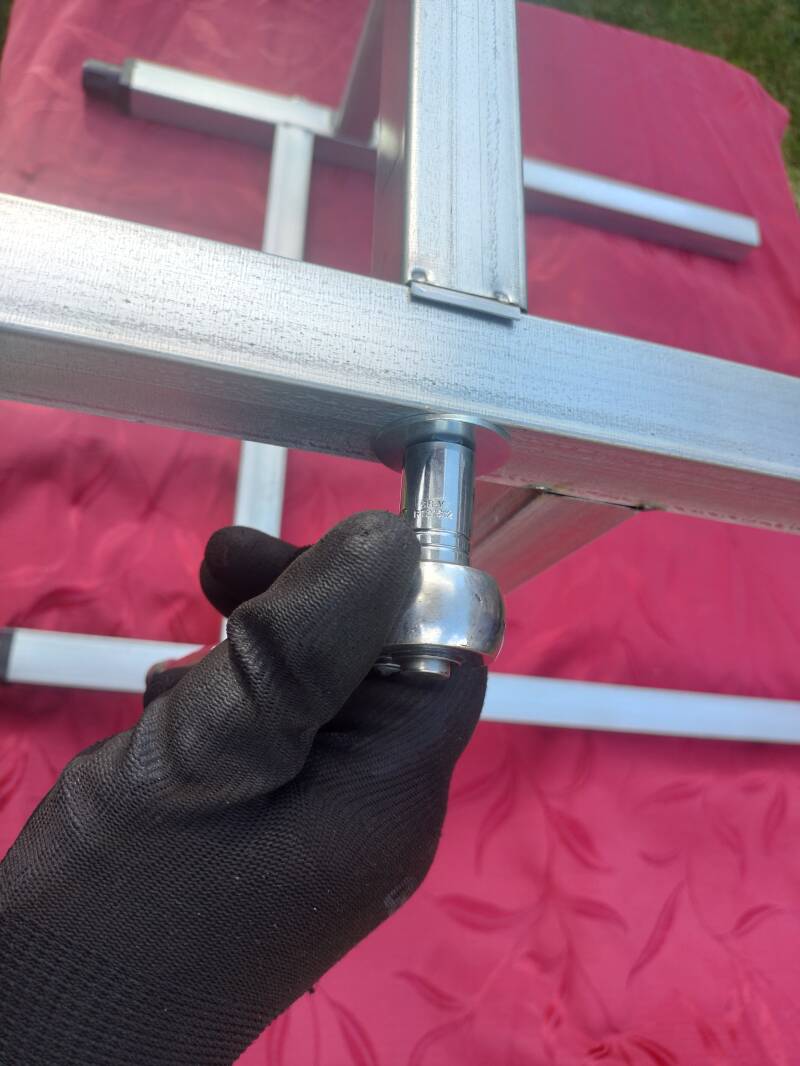
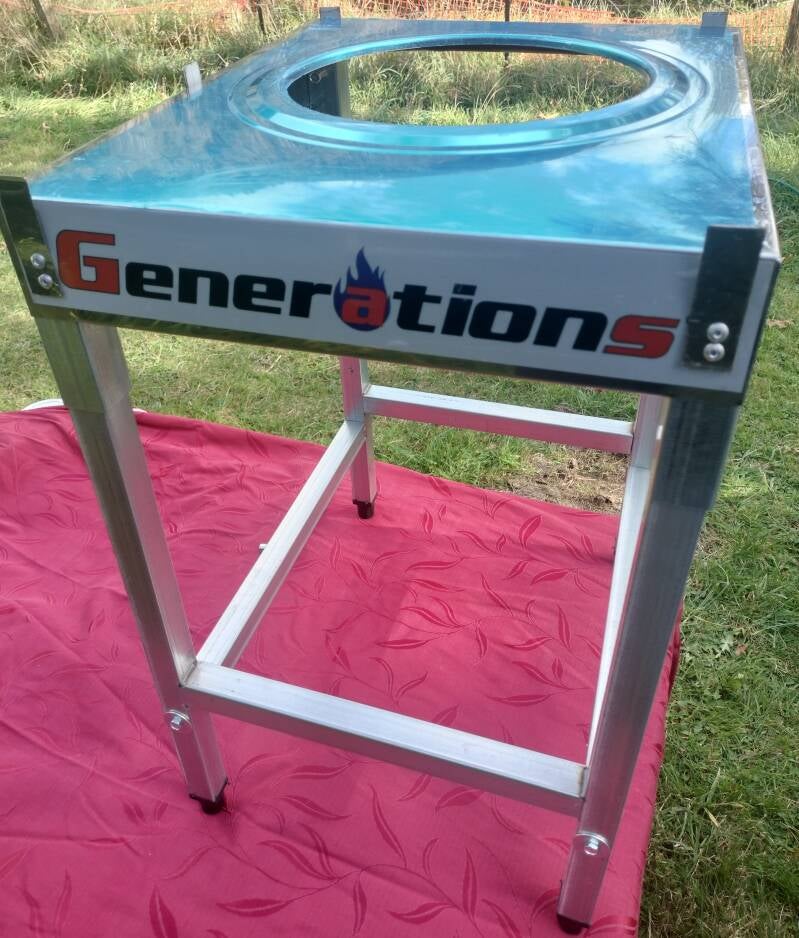
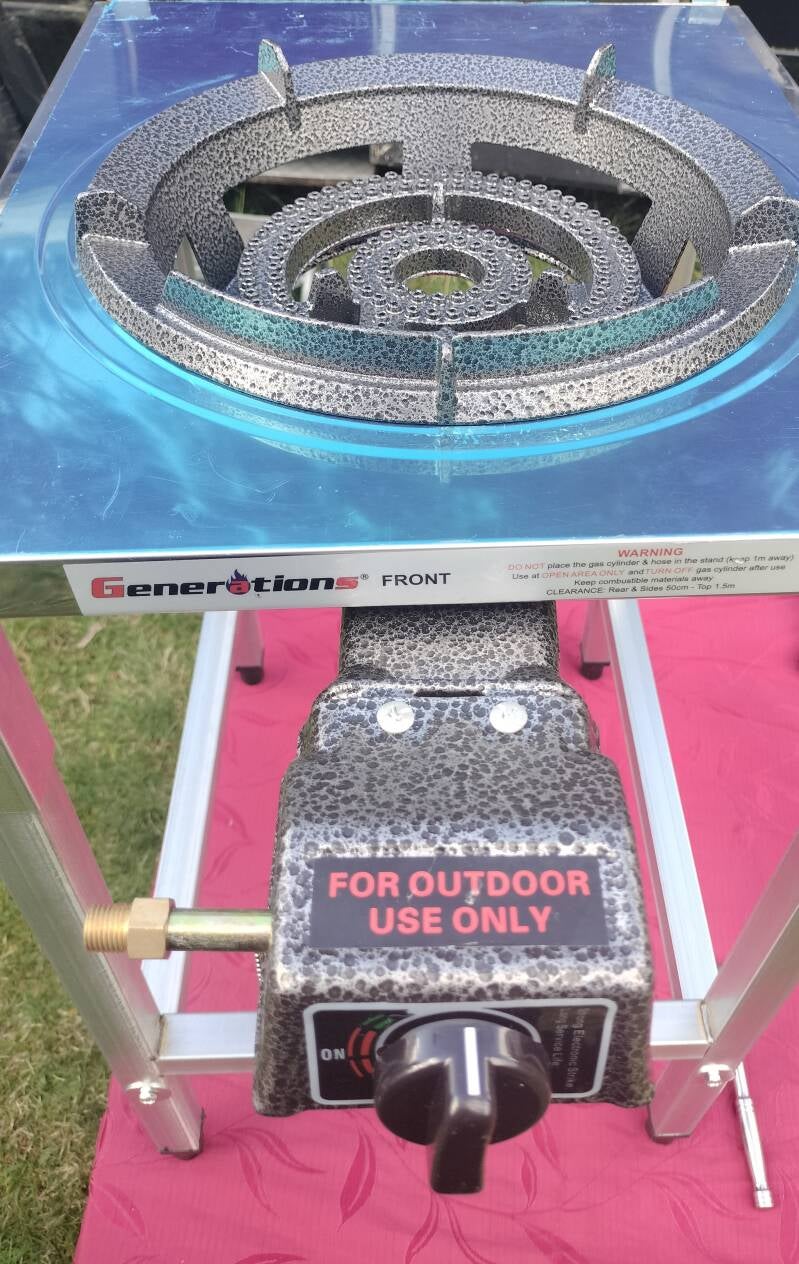
The photo below shows the burner top on the stand.Line up the four metal stubs on the burner top, until it slides down and sits on the bolts in the frame.Check to see if it is level and adjust if necessary.Tighten the small pinch bolts slightly to hold the burner top in place.
NOTE : Always lift the burner stand by the legs and not the burner top.
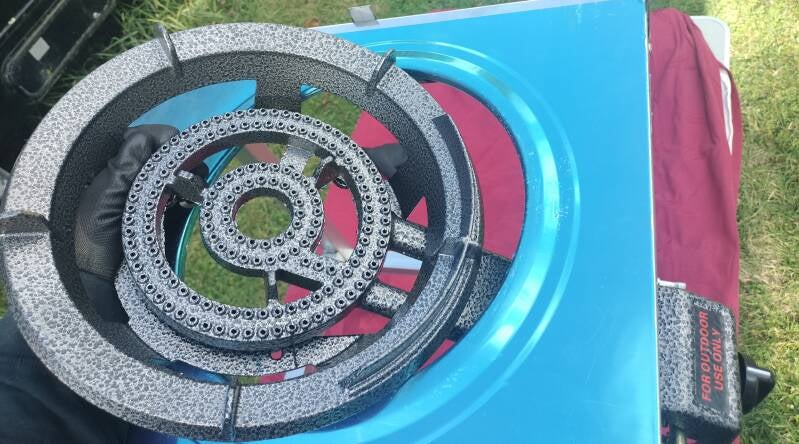
Next,unpack the burner unit and slide it into place,as per the photo.Its a bit hard to see,but the 'black hand' is lifting and guiding the burner hose attachment arm through the round hole in the stand and then into place.The next photo shows how it sits relative to the cut-away in the burner stand top.It goes on the right-hand-side as you are positioned behind the burner stand.
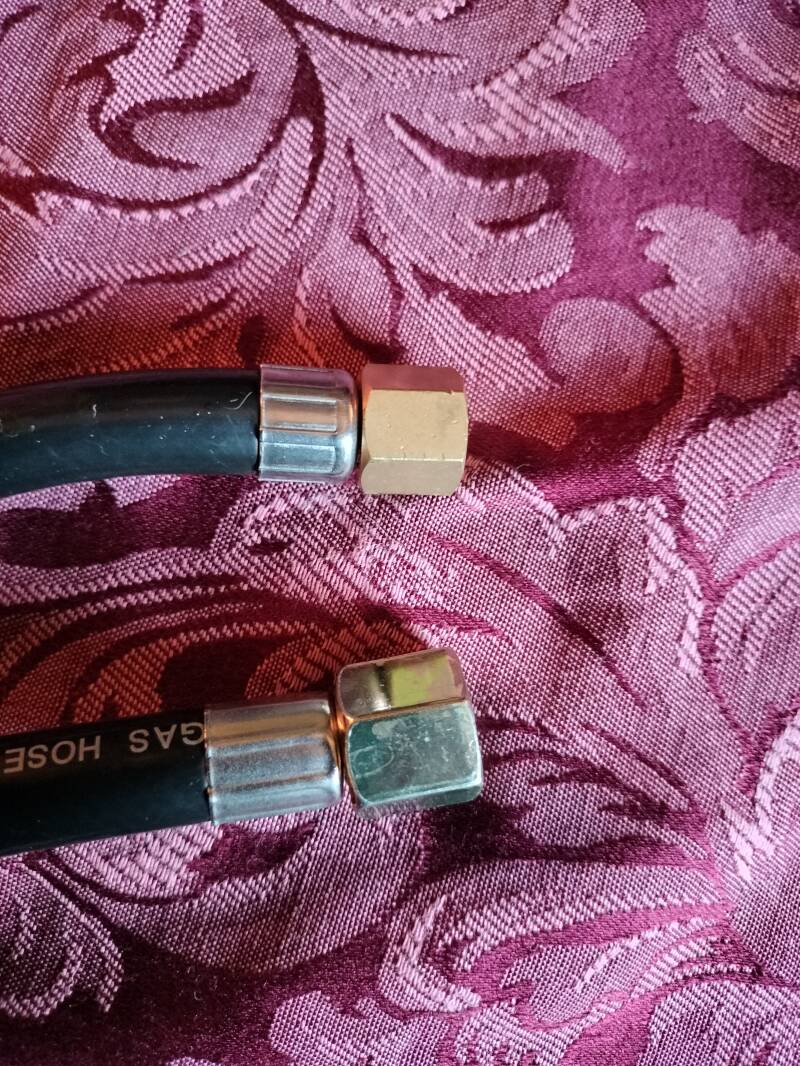
The photo below shows the difference between the two gas supply connection ends.The top one is smaller and goes onto the burner fitting ( as in the above photo ) ,the bigger one goes onto the fitting on the Water Heater.Put some water mixed with a little dish-washing liquid in a spray bottle and spray on the gas fittings,if there are bubbles when you turn on the gas bottle tap get some Gas Seal tape to put on the joints.Its like Teflon tape,but suitable for gas applications.
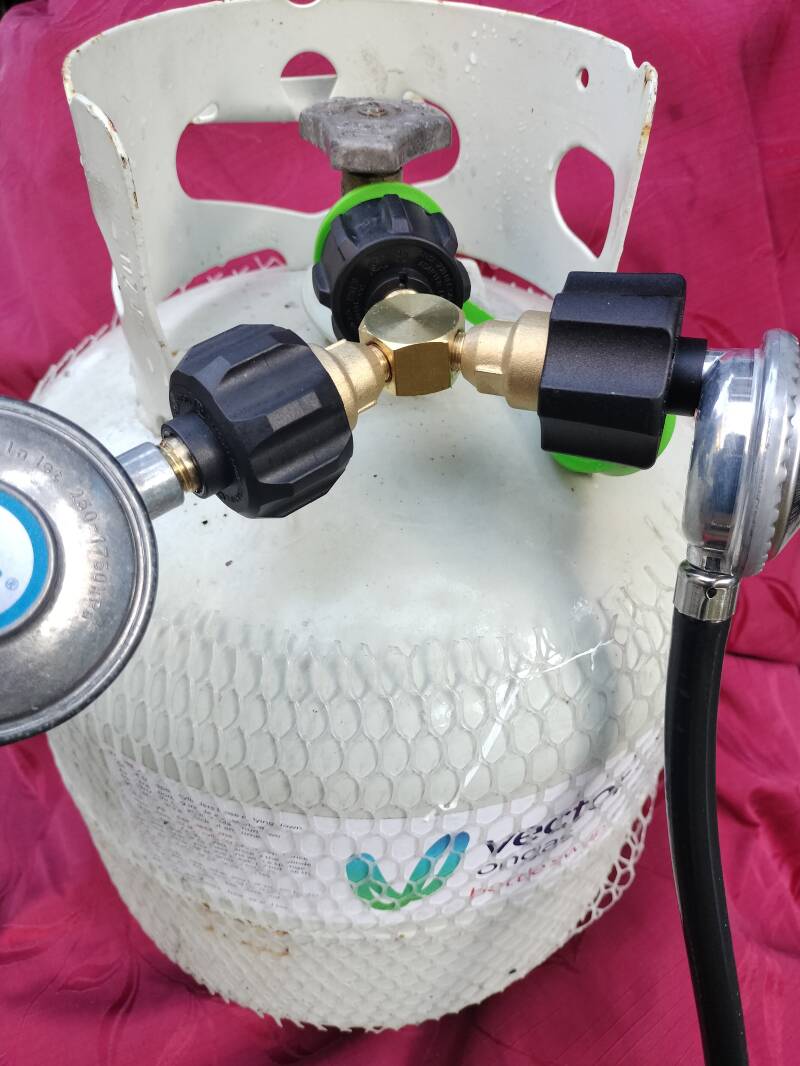
On the subject of gas, below is a pic of the Gas Splitter attached to the bottle.This does away with the need to carry two gas bottles.Both the burner and the water-heater use minimal gas so one bottle is plenty.
Next,we install the wind-shield / splash guard.( As below.)There are two metal tabs on each side of the burner top,and one on the front.Slide the shield down between the tabs and the burner top until it is properly seated.You can see the left side one is fully seated,and the right side one has just been started and yet to be pushed fully down.
( NOTE : The burner top and shield have a protective adhesive coating in place to keep the surfaces from damage during transit, simply peel these off before use. )
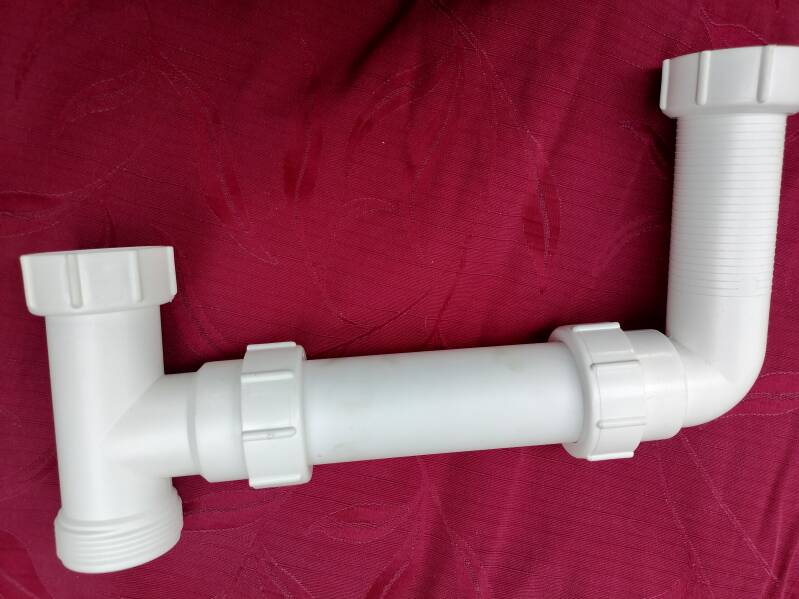
NEXT : Assembling the Sink Unit.......
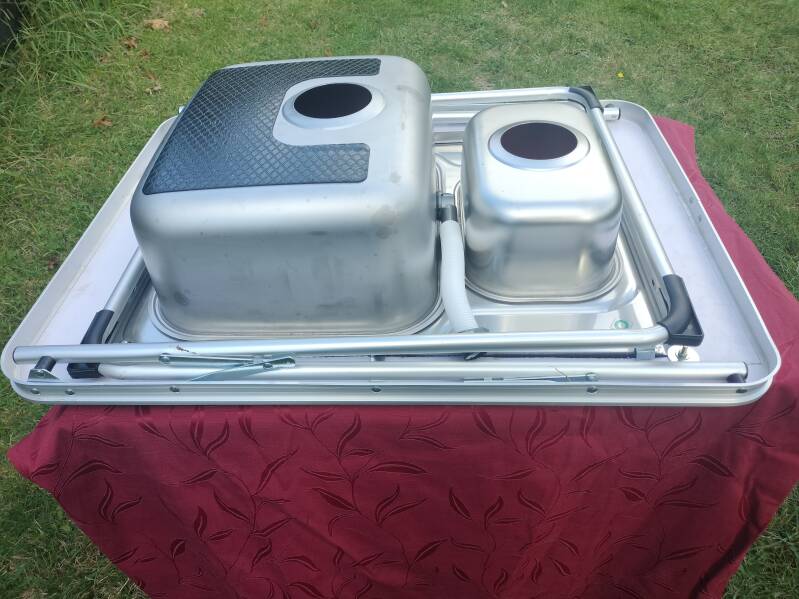
Below is a photo of the Sink Unit as it arrives....The waste attachments and pipes have yet to be attached because they would possibly be subject to damage in transit...
IMPORTANT : Please note how the legs are folded......the set hinged at the smaller sink end fold in first, before the set at the bigger sink end , this ensures the table sits almost flat for travel .
The photo below shows how the waste units attach onto the sink,notice that the left-hand one has an outlet , that the overflow from the large sink goes into.The right-hand one can face any direction.
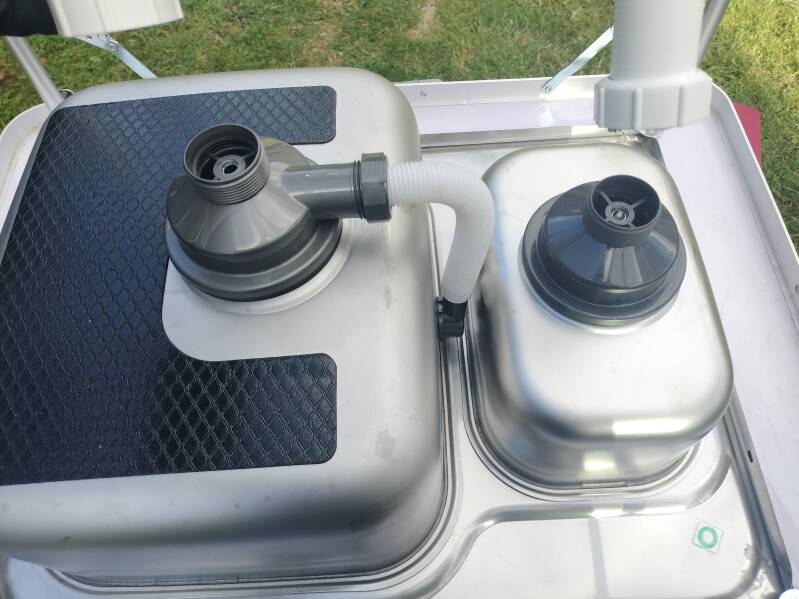
Below, top view of attaching the upper waste trap to the sink,note that the white nylon washer goes under the trap.....
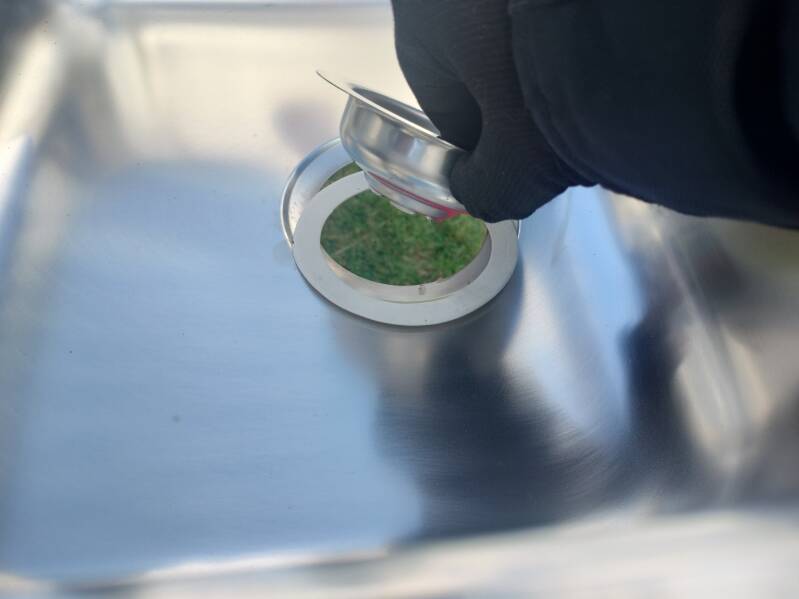
While holding the upper waste trap in place with the attachment screw facing down,reach underneath the table , ( if you have it standing up, ) and screw it on.The large dark-colored washer goes against the sink unit. If you are installing the waste with the over-flow fitting ,( as below on the left,) ensure it is facing the correct way,as per the photo below.Tighten by hand,then fully fasten down using a wide,flat-blade screwdriver.If not already connected, push the ribbed hose onto the overflow pipe,then attach to the waste unit as pictured.

The photo below shows the waste unit in the process of installation,note that the waste unit is not fully seated properly, due to the overflow pipe not being pushed far enough onto the overflow outlet.If this is a problem, perhaps shorten the ribbed overflow pipe by cutting a few centimeters off it until the waste unit seats properly.
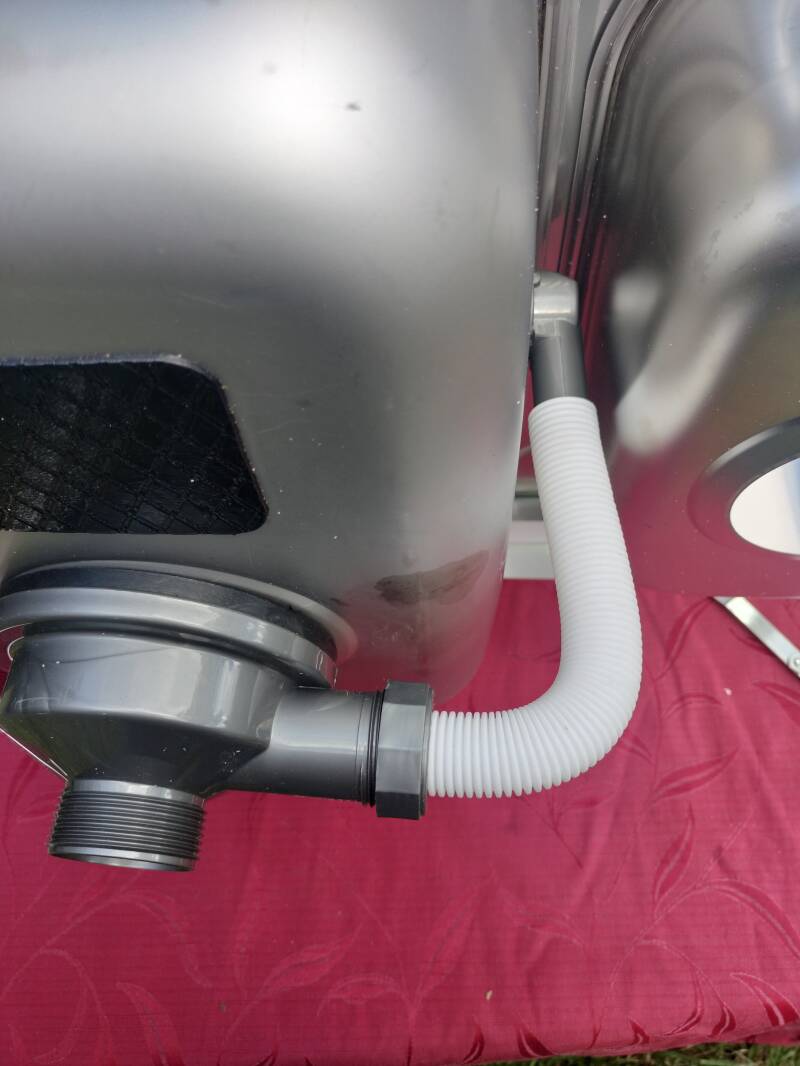
Below ( bottom ) is a photo of the waste-pipe unit that carries waste-water from the sinks to a container under the table.It screws onto the waste units with the straight-through flow going to the waste water container.( Not pictured.) The upper photo shows the correct positioning.

Finally....The Water Heater and pump.....
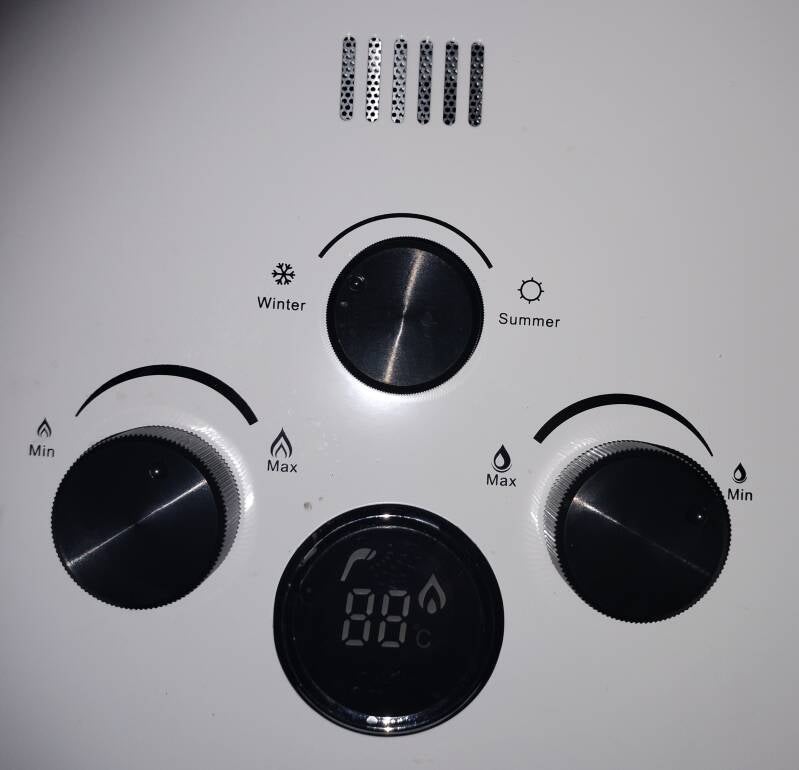
The Wet & Warm 8 Liter Water Heater :

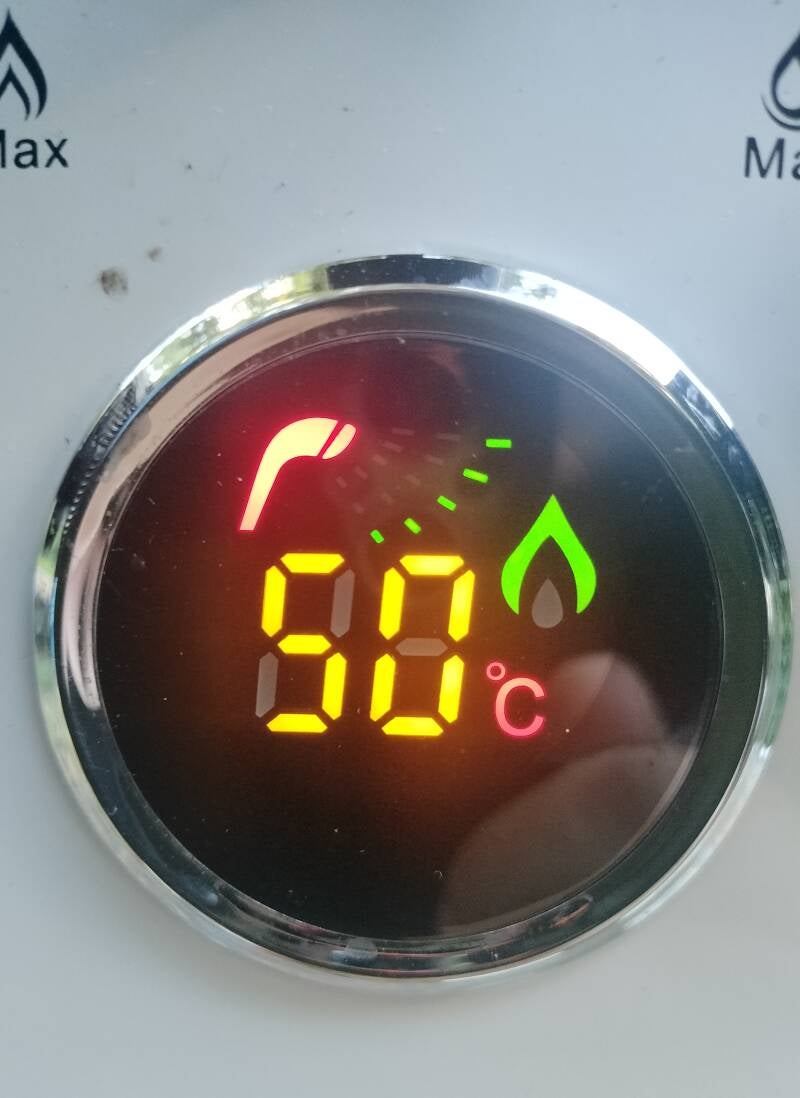
Below is a photo of the control area.Note where the dots are on the knobs,these are correct settings for good water flow and temperature.When the pump is switched on,you will hear the igniter clicking ( this is normal ) ,and the burner will light.The sight-glass in the middle will show a red flame image and the current water temperature.
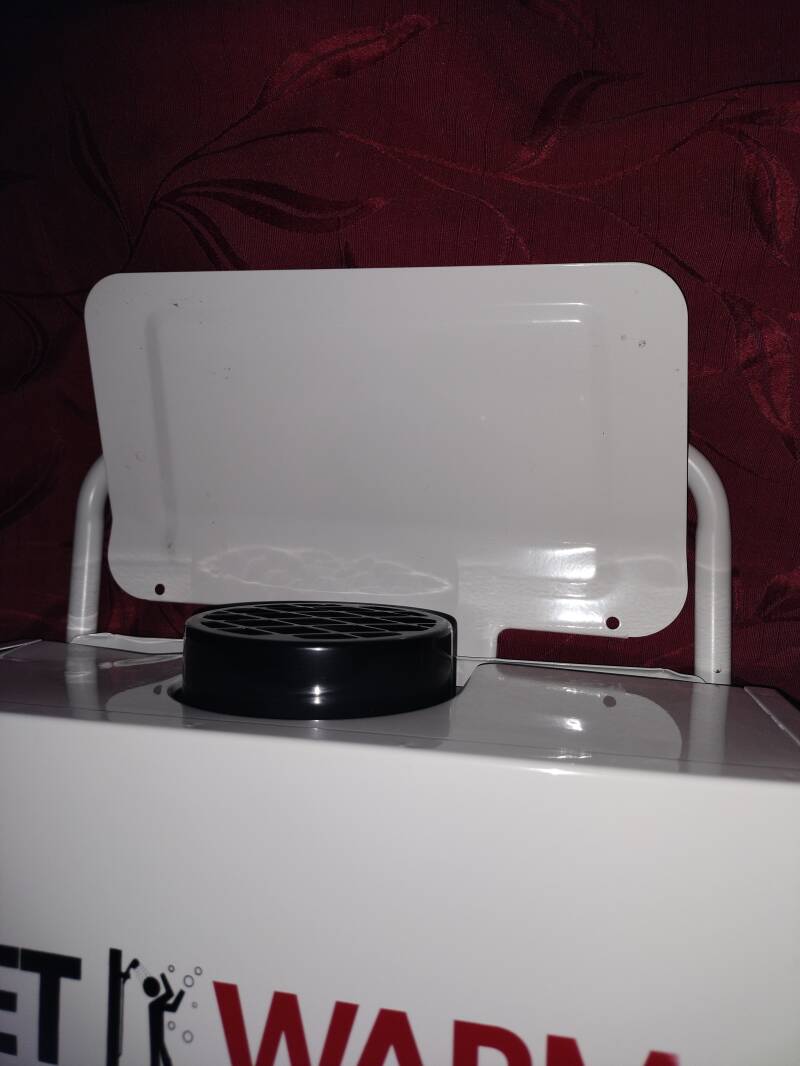
Above is a detail shot showing the exhaust heat deflector in place.It is a good idea to attach it to deflect any exhaust heat away from the Gazebo or your Donutsmobile.........
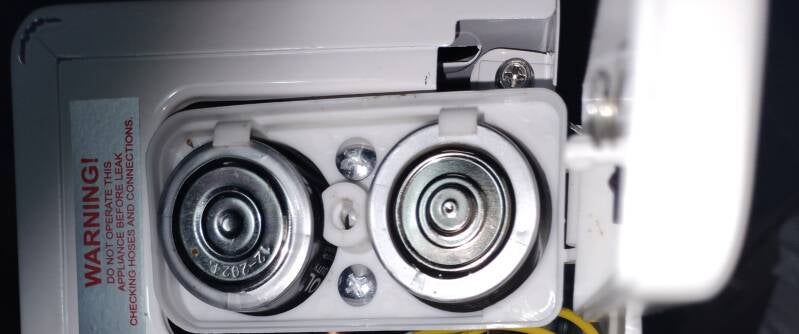
The above photo shows the correct installation of the two size D batteries, ( supplied ) ,that power the heater igniter unit. Please note the orientation of the batteries,the battery pack top is on the right.
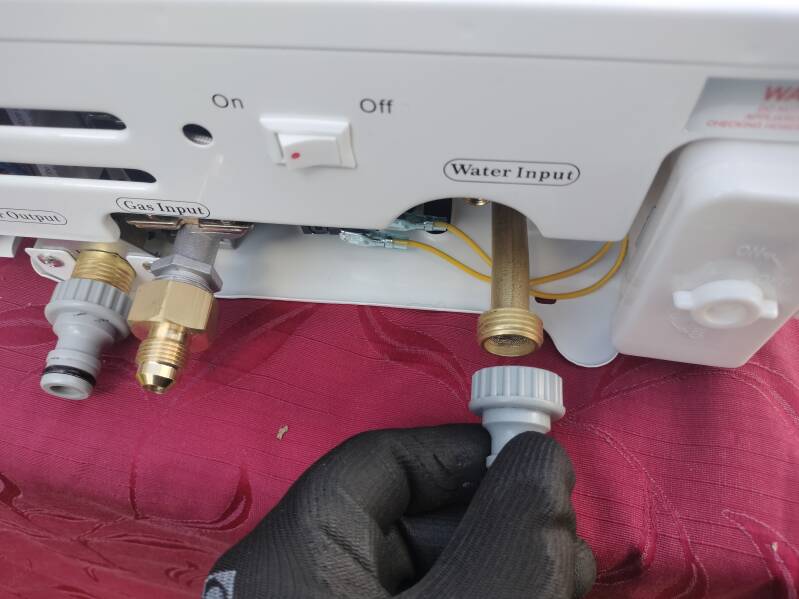
Place the Water Heater on its back on a table.If they are not attached,take the two small water- hose fittings and attach to the water inlet and outlet on the base of the heater,please see photo below.It is a good idea to use some white Teflon tape to avoid leaks.
Notice the On/Off rocker switch shown below on the underside of the water-heater.Switch this on when you are ready for hot water.For cold water, simply switch it off.
NOTE: Be gentle with the plastic fittings,we have found them hard to locate in N.Z.However if they break,we know of an adapter that can be used with full-sized tap fittings.
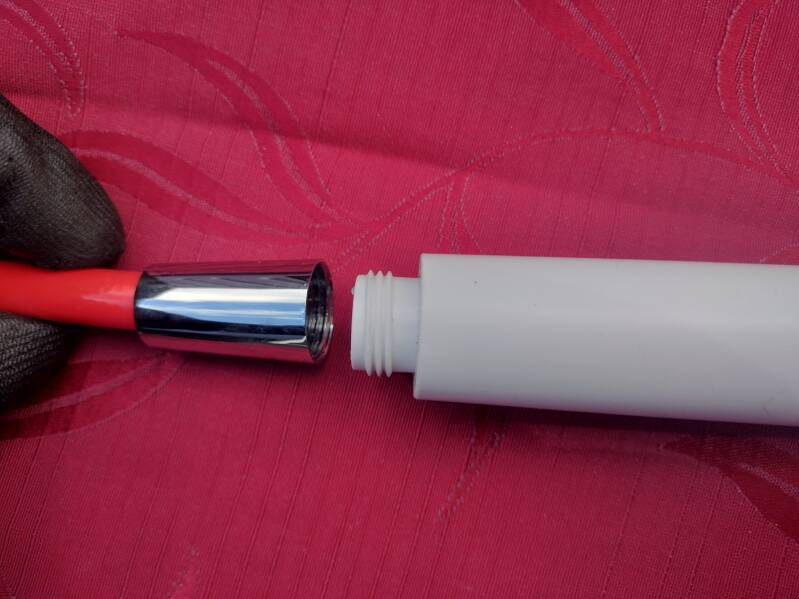
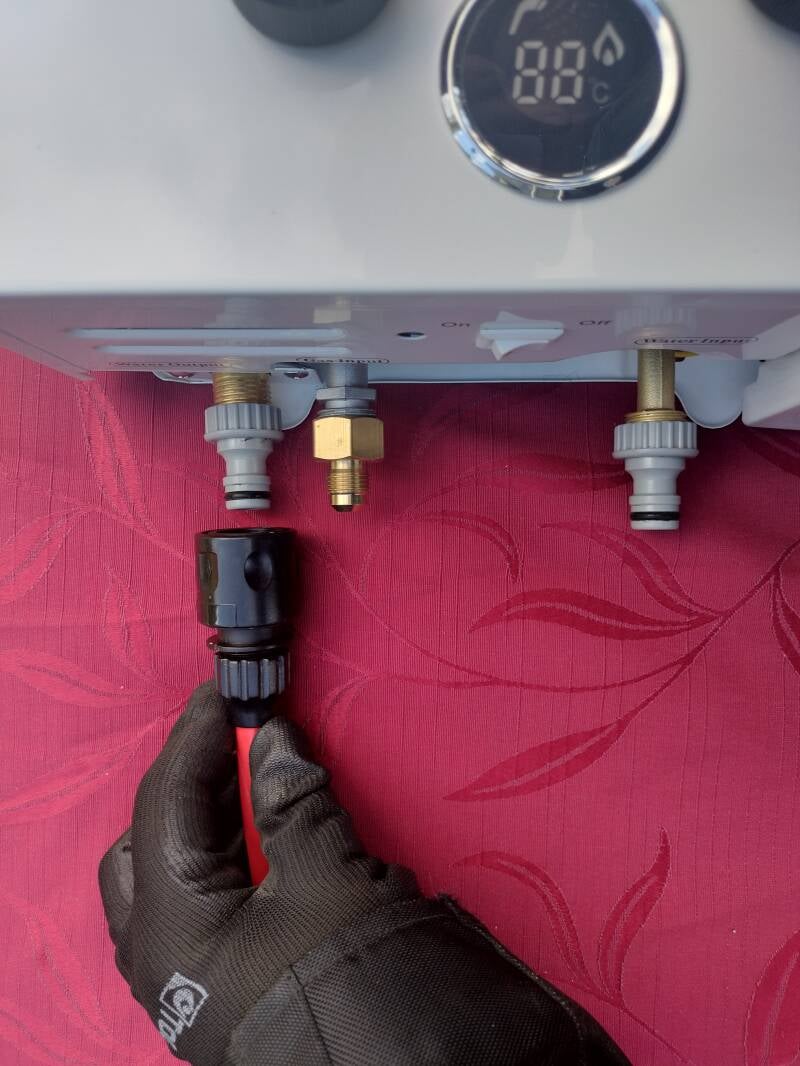
Next ,take the red hose with the chrome end on it and screw the shower head handle onto it.Then attach the other end to the left hand outlet,( marked Water Output ) ,pressing it on until it clicks.We decided to use the shower head because it is great for washing dishes,and, importantly,it has a push-button on/off switch which triggers the water-pump when water is needed.Refer to the top photo below,the bottom photo shows how to attach the red hose.
Note: If you are using the blue hose to extend the distance between the Water- Heater and the sink,plug it in to the matching end of the red hose using the adapter connector provided.
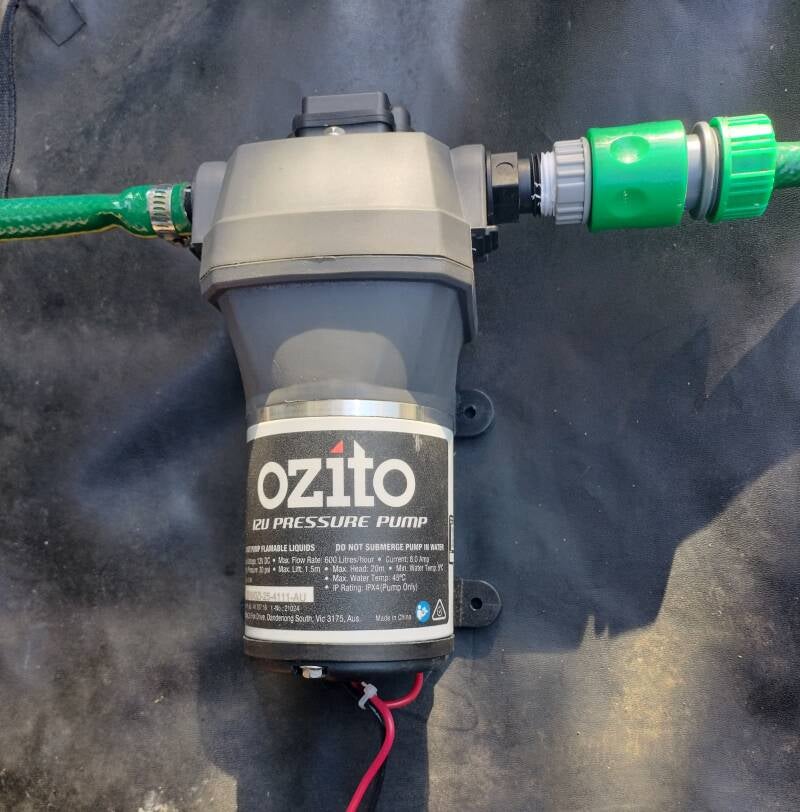
Above is a photo of the high-pressure water-pump,note that on the left is the outlet,the plug-in plastic fitting is attached to the long green hose.This goes to the inlet side of the Water -Heater. ( The right side when facing the front face.) The hose with the snap-on fitting on the right side of the pump goes into your fresh water container.
Referring to the photo below,we are looking at the label side of the pump,so right is right.Press the connectors firmly into place until they click. A good place to attach the pump is on the handle of the water container,using zip-ties.However,the pump is very powerful and can pump from virtually any position.

If you are fortunate enough to be at a Venue with water taps close by, simply connect directly to a tap using an adapter and leave the water-pump out of the line . However,check the water pressure first before connecting to the Water Heater,as only a low volume flow of water is required.
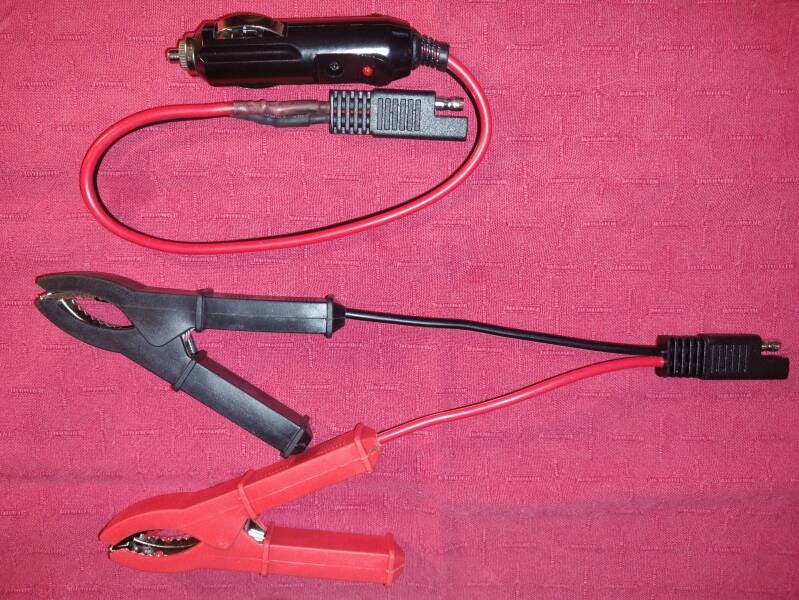
Included with the 12 volt water pump is approximately 5 meters of electrical wire, set up to use either the cigarette lighter in your vehicle,or an alligator clip adapter to go directly to the battery under the hood. This is because oftentimes the cigarette lighter socket is faulty, or the fuse may be blown, and direct attachment to the vehicles starting battery is required.
We have upgraded the 12v water -pump to a high-pressure type.It pumps 10 liters per min and will pump to height of 1.5 meters,so it is a bit more pump than is required,but it is better to have more pressure than not enough.The pump is pictured below,the water inlet ( hose from your tank ) is on the right,and the outlet ( hot/cold water to the hand held Showerhead) ,is on the left.

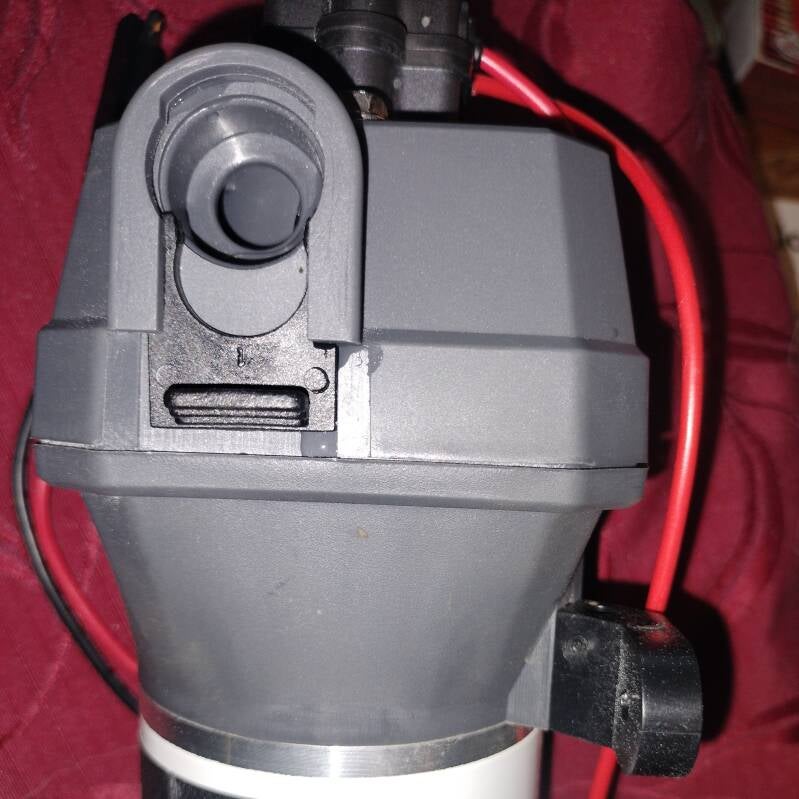
Below is a detail photo of the water inlet on the pump.The attachments come to you fitted onto the hoses,simply attach by pulling down on the plastic tab,inserting the connector with the o-ring on it into the pump body ,and pushing the tab on the black plastic retainer up.Please refer to the instructions that are provided with the pump for further information.
The photo below shows the cigarette lighter adapter ( top),and the alligator clip adapter (bottom.) Sometimes the ignition switch may have to be in the Accessories position to get electricity to the cigarette lighter socket.Check this, and also twist the adapter back and forth a few times when it is in the socket.This sometimes helps.If no luck,simply disconnect the cigarette lighter adapter and attach the alligator clip setup.Pull the adapter connector apart and push the required adapter plug in its place.Open the bonnet,locate the battery and attach the Red clip to the positive terminal,and the Black clip to the negative terminal.
Check out the photo below,it shows how to attach the alligator clip adapter across a typical battery.Look for an + marking near the terminal ,this is your Positive terminal,where you attach the red alligator clip. The black alligator clip goes to the other (-) negative terminal.You should only do this when all water and gas connections are made and not leaking.Also,make sure the push-switch on the shower-head is off.
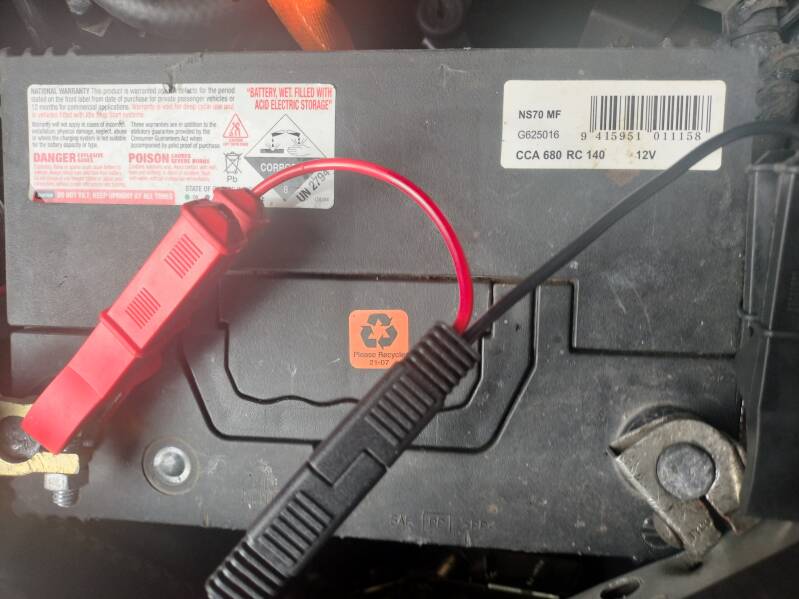
You may find your vehicle has an enclosed battery-box, and the terminals cannot easily be accessed.These vehicles generally have an accessible Positive ( Red ) terminal in the engine compartment.( See below.) Attach the red alligator clip to this,and the black alligator clip to a solid earth on the engine,or a bolt on the firewall or engine compartment sides.

Here is a handy hint : the green pickup hose that goes into the clean water container will always want to curl up.Find a clean,used wire coathanger and cut it at both ends where it curves. ( See photo below.) Attach it to the hose to keep it straight using a few zip ties.This will keep the intake end of the hose at the bottom of the water container.Remember,this is hand and utensil washing water and not for drinking,so having a bit of wire in the tank is not a problem.We have included some spare green hose, to allow the clean water tank to be placed in an area that suits the operator.

Very important hint! Always carry plenty of water if you are unsure as to whether there will be a hose tap to hook up to. ( Always assume there won't be.) Like all outdoor activities that need water, it get used quicker than you think! Carry as many containers as you have room for,and ensure the four containers that you use to anchor your Gazebo have good clean water in them for emergencies.We are using 10 liter containers for the photos, because we had some, but they really are are a bit too small,20 liter containers or bigger are ideal .
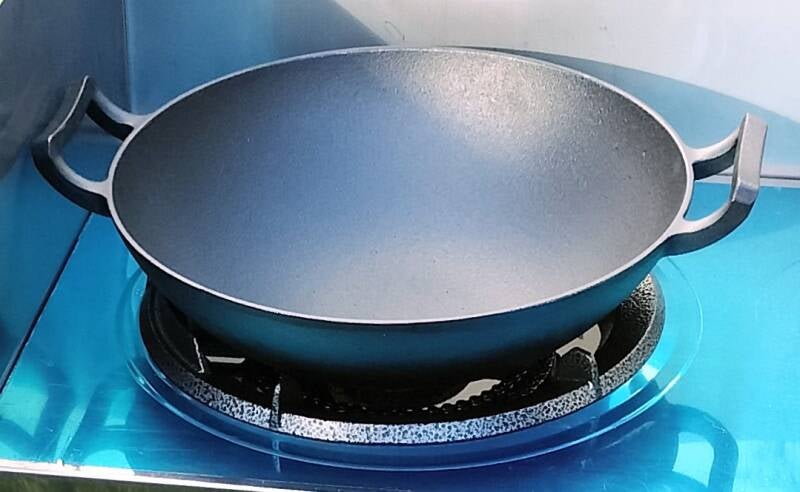
The Wok is a heavy-duty cast iron type.This has a great heat retention rate,and is very solid and ideal for heating Canola oil.It holds it's heat longer than a conventional carbon-steel unit.This should be remembered at pack-up time, leaving it to cool right down before putting it away in your 'Donuts-Mobile'.Photo below shows it on place on the burner stand.Although it will not be used for cooking in,as in a conventional way of stir frying,etc,it may pay to go ahead and " season " it in case you might use it for regular cooking in the future.Seasoning involves washing it,heating it up a bit, and swabbed the entire inner surface using some canola oil on a paper towel held by a pair of tongs.The wok surface may be porous,so it's a good idea to seal it.Please Google the process on-line to choose a suitable seasoning method .
GET IN TOUCH.......